According to the United States Geological Survey, water must have 60 or fewer milligrams of calcium carbonate per liter to qualify as soft.
While a water softening system will do most of the work for you, how do you maintain your water softener system to ensure that result?
The process is reasonably involved with three distinct phases.
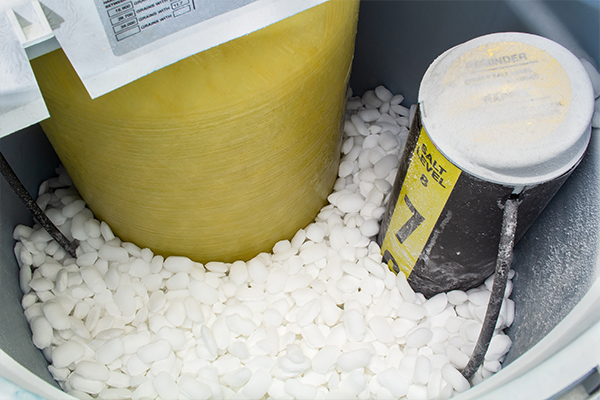
Phase One: Maintain the Brine Tank
This phase has four essential steps to keep your system healthy.
-
Step 1: Check your salt levels monthly.
-
-
Salt is the key element of the water softening process. It revitalizes the resin beads and allows them to continue working. Your owner’s manual should provide specifics, but generally, fill your tank at least half full of salt and keep it about three inches above the water level.
-
-
-
Step 2: Know what kind of salt to add—granular, tablets, or salt blocks.
-
While granular salt is the most common in water softeners, many people buy it in pellet form because regular salt crystals can clog the tank.
-
Rock or coarse salt is the least expensive but most impure. The impurities decrease efficiency, dirty the tank, and require more frequent cleaning.
-
-
Solar salt comes directly from seawater evaporated in sunlight and is much purer than rock salt.
-
-
-
Evaporated salt dissolves from its raw state and converts back into sodium chloride by extracting all the moisture with heat—leaving 100 percent salt. It is the purest form of salt and, therefore, the most expensive.
-
-
-
Step 3: Break up any salt bridges.
-
-
Salt can form a solid layer in the brine tank, blocking loose salt on top from mixing with water below and preventing the softener from working. Pour hot water over the bridge to help it soften & dissolve, then use a broom handle to break the bridge.
-
-
-
Step 4: Dissolve mush.
-
-
On the other side of the salt bridge coin, your salt can form a mush pile at the bottom of the tank forcing the water to rise around it rather than mix with it. Mix the mush pile with the water in your tank with something like a boom handle. If this doesn't work, you can also scoop the mush into a bucket, mix it with hot water, and pour it back into the tank.
-
-
Phase Two: Clean the Tank
-
Step 1: Know when cleaning is needed. Water softeners can go years without cleaning, but if your water turns hard and the steps in Phase One don’t fix the problem in a few days, it’s time to clean the tank.
-
Step 2: Empty the tank. Shut off the water intake via the bypass valve, drain the water, dump the salt, and throw it out.
-
Step 3: Remove the brine grid. In some models, there is also a mesh platform at the base of the tank. Set it aside before cleaning.
-
Step 4: Scrub with soapy water. Mix a liberal amount of dish soap into a gallon of warm water, pour it into the tank, and scrub the interior with a stiff-bristle brush.
-
Step 5: Rinse. Pour out the soapy water after scrubbing, replace it with plain water and swirl through the interior of the tank. Repeat as necessary to get rid of soapy residue.
-
Step 6: Clean with bleach. Mix a quarter cup of bleach in two gallons of warm water. Pour mixture into tank and stir. Allow mixture to stand for at least 15 minutes before discarding.
-
Step 7: Rinse and refill. Drain the bleach mixture and rinse with fresh water. Repeat as necessary to remove bleach residue. Replace your brine grid. Replenish both salt and water as in Phase One, step one.
Phase Three: Additional Measures
These are some extra steps you can take to keep your system running smoothly:
-
Exercise the valves. About once a month, adjust the bypass valve to cut off the softener from your water supply temporarily. Turn the intake and outtake valves to the off position and back to their original position before returning the bypass valve. Leaky or dripping valves may require new washers or seals.
-
-
Flush with water softener cleaner. Pour a cleaner into the brine tank according to label instructions to help keep the resin efficient and functional.
-
-
-
Clean the valve between the brine tank and resin tank twice a year (or if the brine tank gets clogged). Follow your manual carefully because not relieving the water pressure before disassembling the valve could cause injury or damage to parts.
-
-
-
If your water is still hard, one of these things could be the problem. Check to see if the bypass valve is open and if the regeneration timer is set. Make sure there are no kinks in the hoses. If your water use has increased, set the regeneration timer to run more frequently.
-
If the DIY cleaning life isn’t for you, Advantage Water Conditioning offers a salt delivery and maintenance package for your system—leaving all the service to our expert technicians.